
Phase 1 - just the temperature logger
Title: Temperature Data Logger
Problem addressed/functional need
Through this past fall, I was constantly curious of temperatures on my farm. Temperature differences inside and outside the greenhouse, under row cover both in the field and in the green house. I was inspired by the Fido, the temperature alarm that sends text messages . But want to start out a bit more simple and grow in a slightly different direction (ie. adding an LCD for instant gratification, adding relays to control the greenhouse heating and cooling systems. So here is the most basic datalogger I was able to build and have the ability to expand.
Functional Description/approach
At this stage this isn't too different than many data loggers you can find on the internet. I have been involved in many forest ecology projects before I started farming and we often used datalogger from Onset Hobo Dataloggers . I always found these to be expensive and hard to expand. When I started looking around the net for DIY programmable logic controllers I happened upon the Arduino and other projects like the Fido - GH monitoring project here. This seemed to me to be the way to go, so I got myself an Arduino and some prototyping parts (ie. bread board, jumper wires) and started learning how I could create something that would fit my needs.
How to use the tool
In its current form once everything is working you set it out and forget about it, then come back and look at the data. I have a lot of experience analyzing and graphing data. Once I get some data I will add a how-to on that as well.
Bill of materials and Sourcing
$30 Arduino Uno
$6 Power source (either a 9 VDC 1000mA regulated switching power adapter, or 8 x AA battery holder with 5.5mm/2.1mm Plug and On/Off Switch)
$20 Adafruit Data logging shield
$2 TMP36 Temperature Sensor
$8 SD Card
$2 22 gauge wire
$68 Total plus tax, shipping and potentially an enclosure to put it all in.
Tools:
40 watt soldering iron station
Wire stripper
Wire cutter
Solder
Construction/how to build
This is a pretty simple project and a good way to get your feet wet in the world of electronics and soldering. The construction aspect is divided into 2 parts the build (ie. soldering together the electronics) and the software (ie. uploading the programming to the arduino). The process is pretty well documented already at adafruit.com, however I found some of the information hard to follow and maybe already a little out of date. I also made a few small modifications.
The build
1) The first thing to do is solder the break away headers to the data logging shield. I did this by putting the male pins of the breakaway header into the arduino unit, then placed the shield on top so all the pins came through, then started soldering. It doesn't take much and the idea here is to heat the pin with the soldering iron and then melt the solder onto the pin (a touch of solder onto the iron helps heat transfer).
2) Next I soldered my temperature sensor into the prototyping area. I did this by bending the pins to fit through the holes then soldering them from the back. Then I soldered the ends of the wires into the holes adjacent to their pins. One side of the temp sensor goes to ground, the other to 3v, and the middle I put on analog pin 0. I then folded the pins over and soldered on top of the adjacent temperature sensor pins.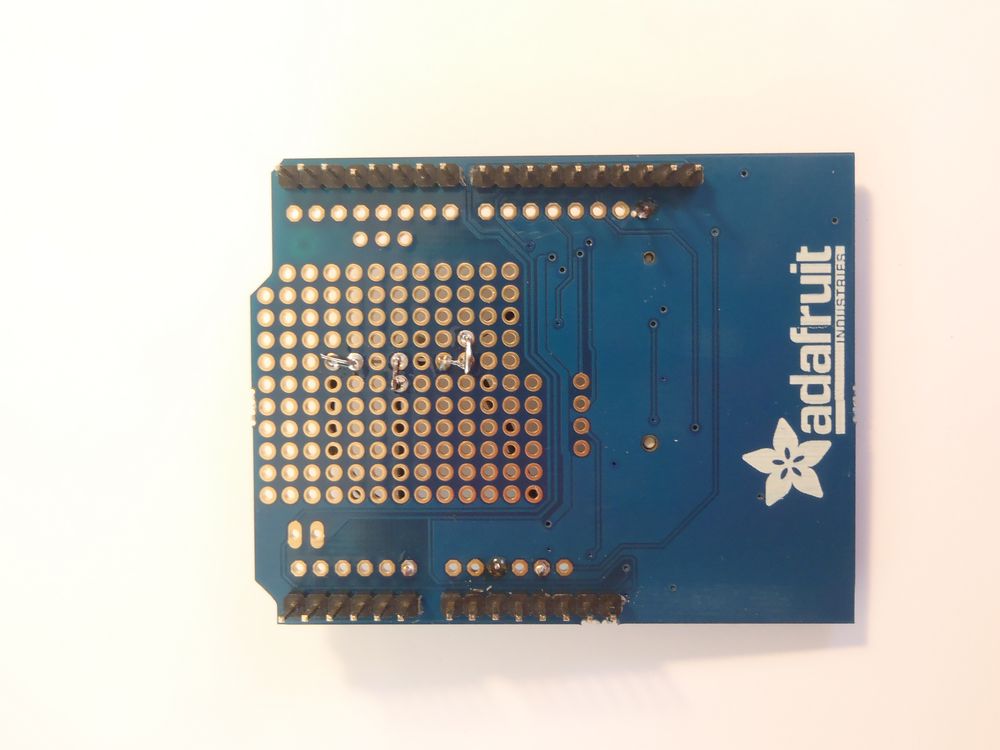
That's it, stick in the SD card and the battery for the RTC (Real Time Clock).
The Software
The first step is to load the Arduino software and drivers. This is explained well on the Fido, the temperature alarm that sends text messages. The first thing I did was go online and do a bunch of tutorials to get familiar with how building circuits work and how the software coding works. I really liked Jeremy Blooms Tutorials I didn't get through all of them, but enough for what I wanted to build.
Now you are in the Arduino Environment. But before we can upload our sketch we need to add the RTClib library. Look for the zip button to download the file, and extract it. Copy the 3 files and the examples folder into ../arduino/libraries. If the Arduino software is open, you have to close it and reopen it to load the new library.
Time to upload some sketches.
The first thing to do is to set the date and time for the RTC on the datalogger shield. This is already well documented
How to use the RTC
After that you just have to upload the temperature logging sketch (modified from adafruit's fridge logging script ) and you are ready to go!
templogger
But first lets test to make sure everything is working right, and adjust the intervals of how often the Arduino writes to the SD card. The sketch writes the data to both the SD card, and the serial port. This allows you to open up the serial monitor in the Arduino software (Ctrl+Shift+M, or tools>Serial Monitor) and monitor what is getting written to the SD card. The sketch is written to write to the read the sensor and write to the SD card every second (1000 milliseconds).
I want to be able to leave this logger out for longer periods, but each time we write to the SD card it uses 2048 bytes, on a 2gb card this gives us about 975 measurements (or a measurement every hour for 40 days). So for starters I changed the Log_Interval and Sync_Interval to 1800000 which should write to the card every 30 minutes. Once this is all to your liking plug in the battery brick or AC adaptor, put it somewhere special and wait.
Next steps/goals/barriers
Well only being able to measure one place at a time isn't too interesting from a statistical stand point. My next step will be to add a second temperature sensor so I compare temperature under and outside of the row cover in my greenhouse. How cold are my poor salad greens really getting out there.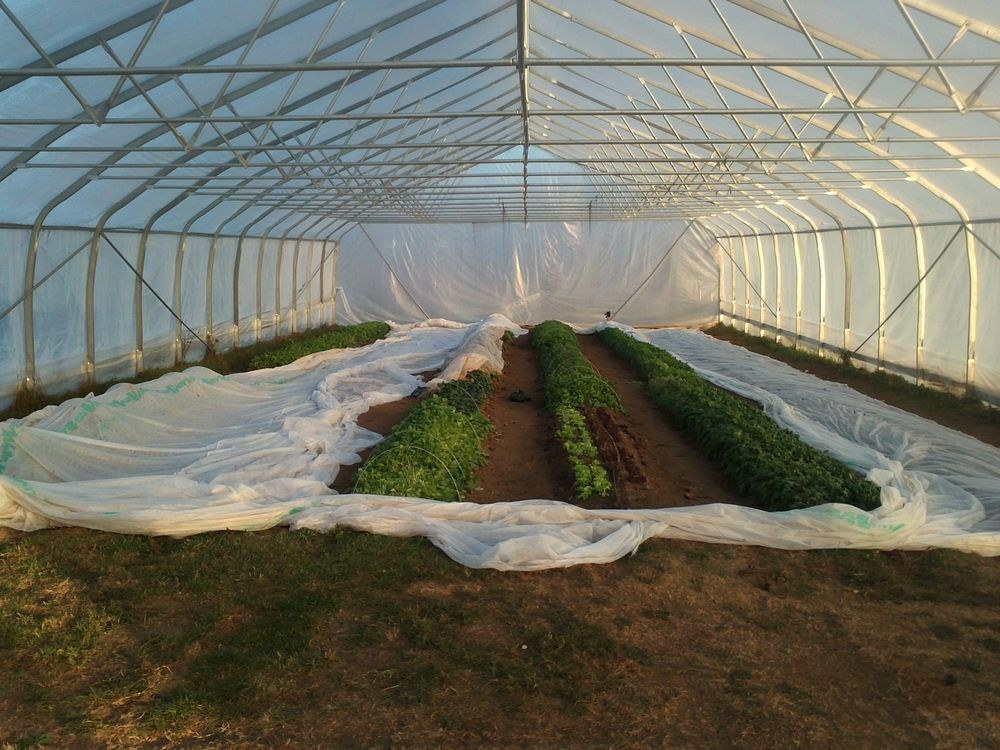
I would also like to use this device or a similar one to turn on the furnace this spring when we put our seedlings out there. I just got a couple of power switch tails from adafruit.com in the mail, so this project isn't far away...but first I want to log some temperatures.
Marketplace
If people want one of these but don't feel comfortable with the soldering or programming send me a message and I am sure we could work something out.
Phase 2 - external temperature probe
Bill of materials and Sourcing
$30 Arduino Uno
$6 Power source (either a 9 VDC 1000mA regulated switching power adapter, or 8 x AA battery holder with 5.5mm/2.1mm Plug and On/Off Switch)
$20 Adafruit Data logging shield
$2 TMP36 Temperature Sensor
$8 SD Card
$2 22 gauge wire
$10 sealed waterproof external temperature probe (DS18B20) with 4.7k pull-up resistor
$78 Total plus tax, shipping and potentially an enclosure to put it all in.
Ongoing projects
Like I said above,
1) Add external temp sensor
2) Add LCD display
3) Add relays to control greenhouse furnace.
Comments
nice post