
Image:

Exclude from the Tools list. This is "sandboxed".:


This project turns a 5 gallon bucket into a high capacity, automatic fill humidifier.
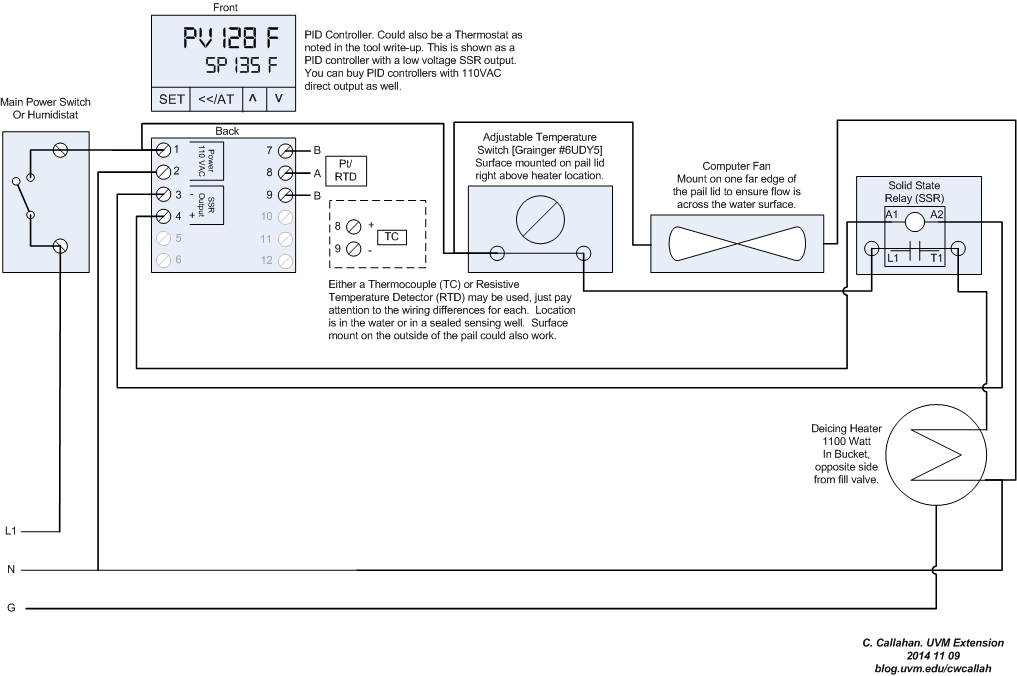
Parts ($155 with new parts) (1) 5 gallon steel bucket and well-sealing lid ($23.00 new) - McMaster-Carr #4211T65 (1) 1150 Watt heating element – Side mount deicing heater ($63.00) – McMaster-Carr # 3583K91. Alternative: You could probably use the heating element from an electric tea kettle or other hot water heating device for less cost. We used a simple, but more expensive approach for the prototype, which allowed for keeping all electrical connections out of water and at the top of the bucket. (1) Adjustable limit thermal switch. ($20.00) - Grainger #6UDY5 (1) 3", 30 CFM fan (110 VAC) - usually used for computer cabinet cooling ($30.00) - from Radio Shack. More air flow (higher CFM) would allow for even greater humdification capacity (see calculation section), but we sized this for the 4-5 gal evap range. This allows daily checks on the level and function of the prototype in long periods of operation, is quiet, and uses less electricity. (1) float valve, like a toilet tank fill valve ($7.00) - from Home Depot. The toilet fill valve is reliable, inexpensive and has the right form for use in this vertical humidifier. Some pipe strapping was used to secure it in place against the lid. (1) Controller ($32.00) Bought as a package: (1) PID control – Allows tuned control of the heater based on setpoint temperature of the water. Seek a PID control with an autotune function, an alarm option and an easy to read display. The manual for the MYPIN TA4 PID controller can be hard to find online, it is available here. (1) Thermocouple (K-type) – Thermocouple allows measurement of water temperature and provides input to the PID controller for logical action (turn heater on or off) (1) 25 A Solid State Relay – An alternative way of controlling a high power circuit (load) using low power input (coil). The nice thing about solid state relays (SSR) compared to conventional coil / magnet relays is that they are quiet. You may be able to do the temperature control using a thermostat/aquastat. I used a PID controller as I wanted to prove the function of the humidifier with precise water temperature control. In other words, I wanted to be sure my math was correct in practice, and needed steady water temperature to do that. (1) heating thermometer with remote bulb (suitable for 90-130 degF control) ($50.00) - Several options.
Design concept - Heating the water to slightly above the dew point of the target air temperature and relative humidity (RH) conditions will provide a source of humidity that will self regulate at the proper target conditions.
A five gallon bucket was chosen as the reservoir since they are generally and widely available and since 5 gallons will provide a reasonable reservoir even if the automatic fill function is not incorporated. A plastic bucket was used in a first prototype by some melting was noted and we moved to a steel bucket as noted in the bill of materials.
An electric heater is controlled by the PID controller (or perhaps a thermostat) which determines the water temperature and switches the output accordingly. A one thousand (1000) watt heater is specified here since they are widely available and this heater will bring 5 gallons (41.5 lbs) of cold (50 degF) water to a reasonable holding temperature (130 degF) relatively quickly (about 45 minutes). The maintenance heat duty required (due to evaporation of water into the air) depends on the air flow and the incoming conditions, but it will generally be lower than this initial heating duty.
CASE 1 – Target Air Conditions 80 degF, 90% RH In the case of target conditions of 80 degF and 90 %RH (dew point of 76.8 degF), a humidifier reservoir of 90 degF saturating the 30 CFM airflow completely (i.e. dew point of 90 degF) will result in 1.4 lb/hr of water evaporation into the air. This works out to about 4 gal of water per 24 hour period, with an average heating duty of 411 watts. These conditions are reasonable sizing conditions for a meat curing application.
CASE 2 – Target Air Conditions 35 degF, 98% RH For vegetable storage, let's consider potatoes at 35 degF and 98% RH (dew point of 34.5 degF). Keeping the water at 110 degF will result in about 0.45 lbs/hr (1.3 gal per 24 hours) of water evaporation requiring 131 watts of heating duty on average.
The rate of humidification you need can be quite variable and hard to pin down. It depends, fundamentally, on where the water vapor is actually going. In other words, why do you need to humidify. Most times, the vapor is escaping from the room with air just through leakage (infiltration or exfiltration.) At times, water vapor may be condensing out of the air at cold surfaces (like moisture that appears on a glass of ice water on a humid day.) If you know roughly how much water you’re putting into the space to maintain conditions presently (e.g., water on a concrete floor, filling a non-auto-fill humidifier, etc.) you can have a very good estimate of what your load is. Otherwise, some trial and error will be required using this system by adjusting the temperature setting on the humidifier to match the necessary evaporation rate for your system.
You can estimate the amount of evaporation from a warm water surface using the following formula, which I borrowed from EngineeringToolbox.com. The amount of evaporated water can be expressed as: gs = Θ A (xs - x) / 3600 or gh = Θ A (xs - x) where gs = amount of evaporated water per second (kg/s) gh = amount of evaporated water per hour (kg/h) Θ = (25 + 19 v) = evaporation coefficient (kg/m2h) v = velocity of air above the water surface (m/s) A = water surface area (m2) xs = humidity ratio in saturated air at the same temperature as the water surface (kg/kg) (kg H2O in kg Dry Air) x = humidity ratio in the air (kg/kg) (kg H2O in kg Dry Air)
I have made a spreadsheet that uses this formula to estimate the rate of humidification. It can be downloaded here.. Note that this spreadsheet includes a macro in order to solve for wet-bulb temperature given dry-bulb temperature and RH. So if prompted, you’ll have to allow macros to run.
Sparging (sending the air through the water, like bubbling) can be accomplished with a blower instead of a fan. Or careful ducting of the air with some extension plumbing from the fan outlet could do the same function. Testing will determine if this is necessary. It is important to remember that fans are intended for low pressure, high flow applications and blowers may become necessary if too much back pressure is imposed on the humidifier due to additional plumbing or sparging.
Similarly, outlet plumbing/ducting could be included to better distribute and throw the humidified air away from the humidifier. A piece of PVC piping with a cap and some small holes drilled into it might be one way. In its simplest form, however, this humidifier consists of just the fan mounted on the bucket lid and some holes drilled in the same lid on the opposite side for outlets.
There is also a thermal switch included in the design as a safety precaution.