VERSION #1: HAND-PUSHED ROW MARKER
I made two row markers specifically for the farm I work on -- we have 30" beds. Each marker is 22" wide, one marks three rows and the other four, both of which mark a perpendicular line every foot.

Materials List:
3/4" Advantech Plywood - less than one sheet
1"x 2" hard wood, I used red oak - length depends on your size markers
black iron pipe - 2 pieces at 1/2" x 36", 2 pieces at 1/2" x 24" (I had the guy at lowes cut these pieces in half and thread each end in order to fit into a union.
4 black iron elbows
1 black iron union
teflon tape
wood glue
2.5" screws
pipe clamps
5lb and 3lb weights
Total cost is about $60-$65 a marker.
cut out your circles from the plywood - I did an 11" diameter which will roll out 3 perpendicular lines every foot.
Note: To find the diameter circle you need for desired in-row markings, you can either go by trial and error, or use the formula for circumfrence of a circle: pi x diameter of the circle. You want the circumfrence of the circle to be 3 times the spacing you want. For example, if you want the spacing to be 12 inches, you would want a circle with a circumfrence of 36 inches. To find the diameter of such a circle, you divide your circumfrence by pi.

drill holes in center to fit 1/2" black iron pipe.
cut notches to fit red oak cross pieces.
set in oak pieces into plywood circles, glue and screw.
set pipe into marker with additional weights -- add as many as needed for your soil (you might have to do some trials here. I used about 16 lbs for my three row marker.

thread elbows and 36" pipe lengths. finish by threading the union last.


use pipe clamps to hold weights onto pipe -- this will prevent them from sliding around and give even weight pressure in the bed.
It's still too cold for me to use this but I am considering making an adjustment in the way you push the marker. Since I will be walking down the pathway, I might switch out an elbow for a tee fitting to one of the upper corners and add a 12" pipe to extend out so that I can push the marker more easily from the pathway. This is still to be determined so I will update once we start prepping beds.
VERSION #2: **ADAPTATION FOR TRACTOR MOUNTED ROW MARKER:
On our farm, we use beds on 5 foot centers (beds are 4 feet wide), and mark our beds with our cultivating tractor (Farmall 100). We made a new three-row marker this year because we decided to change our spacing to 14 inches between rows (previously 18 inches) to reduce the amount of space we need to cultivate.
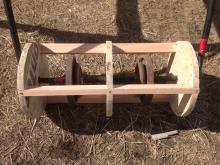
We use essentially the same wooden marker with pipe as Audrey (instructions above), though we wanted the marker to mark every 12 inches so chose a diameter of 11.5 inches for the circles. We also clamped the pipe directly onto onto rear-mounted round stock instead of attaching it to a handle. We mounted the pipe onto the round stock using pipe clamps (the round stock already has holes that can fit the pipe clamp), and to prevent the pipe from sliding out of the clamps or the marker from sliding around when mounted on the tractor, we drilled holes into the pipe and used washers and cotter pins to secure the marker (See attached photo). No weights are needed because the tractor hydraulics provide the necessary force.
Other differences - we made the whole thing out of 3/4 inch plywood, instead of board for the lateral pieces. Plywood tends to be somewhat stronger than board.
The pipe clamps did eventually get bent over time from the force of the hydraulics pressing the marker into the soil. A heavier duty pip clamp or other piece of strapping might solve this problem, though the warped clamps still work fine. Lock nuts would be useful where the pipe clamps are bolted to the round stock, as ours did loosen slowly.


Both tools require the bed to be fully prepared using other tillage tools. You need a fairly well prepared bed for this tool to work - the surface of the bed must be fairly even and surface of the soil must be relatively soft and free from debris for the marker to clearly mark the grid without missing spots. We use either a rototiller, a spader or a bedformer to make beds before using this tool.
basic carpentry