I am a Grower and I want a tool to water my fields easily because watering tranplants quickly is important to for good establishment
Often, water supply is domestic with low pressure. Therefore, only few stationary sprinklers can be used at a time requiring lots of shifting of sprinklers down a planted area. The result is that to water a newly planted area, a lot of effort and time is used. Watering is not consistent as sprinklers make a round profile and beds are rectangular. They need to overlap creating areas which are watered twice while other sections are missed.
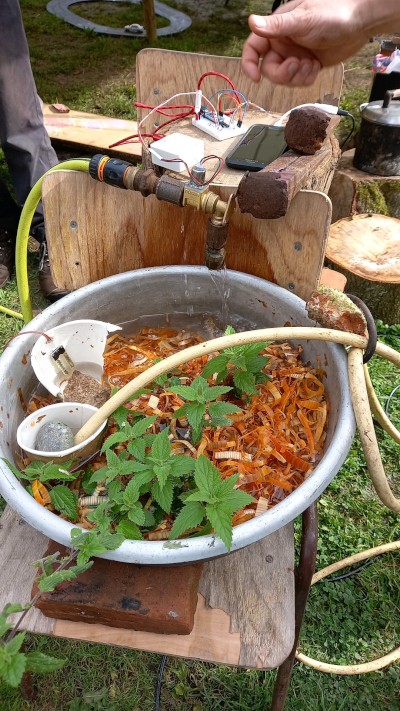
Farmhack Watering System
The watering system we created on the farmhack at the Organic Growers Gathering 2023. This doc is taken from the github project, please go there for further details, code etc.
Videos
Hardware Requirements
- Arduino from Aliexpress (Nano Mini USB With the bootloader compatible for TZTrduino Nano 3.0 controller CH340 USB driver 16Mhz Nano v3.0 ATMEGA328P)
- 5V 1A power supply, could be USB. (0.5A does not work)
- L293d from Aliexpress (L293D L293 293 DIP-16 Stepper Driver Chip IC)
- Electric Solenoid Valve (Brass Solenoid Valve DC 4.5V 1-80℃)
- Soil Moisture Sensor (AZDelivery 5 x Soil Moisture Sensor Hygrometer Humidity Detection Module Kit, Comparator Board F2F Jumper Cable 3.3V 5V Watering System compatible with Arduino)
- jumper cables
- USB-cable
- breadboard for prototyping
References
Valve
The valve is described like this:
As per header, the product itself is excellent, well-made and extremely reliable. However, it is handicapped by absolutely abysmal documentation, which could be very frustrating. I have a serious background in IoT and electronics, but I were almost on the verge of returning it, before figuring out how to make it work. Once I understood it - it is perfect.
- This is an indirect pilot operated asymmetrical valve. It means that it only operates in one direction (watch the arrow on the body showing the direction of slow of water. It also requires a minimum pressure differential of at least 1 bar (in my experience). The more water pressure is applied - the better it will work. It works perfectly with standard UK water mains and garden hoses, but not with micro irrigation systems (not enough pressure)
- If the intake water pressure is lost - the valve will automatically shut
- The thread is UK standard BSP 1/2 inch
- The box includes mesh water filter
- The valve is latching. It means that you only need to apply power to switch its state (open or close) and then it stays in this state indefinitely (as far as water flow continues) - so extremely power efficient
- Control voltage could be anything from 3.3 to 5 volts DC. In my experience 4-5 volts are 100% reliable, as the voltage drops, the operations become less reliable - the valve will sometimes misfire, but eventually will work.
- When switching, the valve draws a significant amount of current - 300-500mA depending on water pressure. It could be operated from a stack of conventional AA batteries, but NOT from GPIO of small IoT devices - you will need a relay.
- To switch state, all you need is to apply a a short (circa 30ms) DC pulse to the two wires. Applying positive to RED and negative to BLACK opens the valve, reversing the polarity closes the valve
- 30 ms pulse is sufficient, however you could apply a longer one - even a few seconds. The only caveat is that you do should not leave it on for prolonged periods of time (hours) - you will eventually damage (burn) solenoid.
- The valve is sensitive to orientation - it must be positioned with the main body parallel to earth an the top assembly vertical. Significant deviations from this angle will affect operations - the valve might not be able to open or close fully.
- The valve is very fast and extremely quiet. The click of switching could only be heard if you are standing right next to it and listening intently.
Motor Driver
The LH293d PDF drives the valve because the Arduino cannot provide enough current to switch it.
Setup
Install the Arduino IDE software. Open the watering_system.ino file. Flash it onto the microcontroller.
Live Plot
- Attach your phone to the Arduino.
- Install and open USB Serial Telnet Server (binds a USB serial converter to a Telnet client)
-
Using the terminal, connect to the server. This uses ip
172.16.0.135cd plot # we will work in the plot directory telnet 172.16.0.135 2323 >> data.txt & -
Create the virtual environment and install dependencies.
virtualenv ENV python3 source ENV/bin/activate pip install -r requirements.txt -
Live-plot the chart.
source ENV/bin/activate python chart.py
This is an example of how the live plot looks:


CHANGELOG
- day 1: The watering system has one threshold: If the moisture is below the threshold, it switches the valve on. If the moisture is above, switch the valve off.
- day 2: The watering system has two thresholds: One to switch the watering on, one to switch it off.