Function:
This data logger records soil moisture levels using a corrosion-resistant capacitance sensor at a set frequency and stores those values on an SD card. The power-controller circuit between the battery pack and the Arduino Uno greatly extends the battery life to many months, allowing for long-term data collection that can help elucidate soil-water dynamics across a field. This design is modular and other Arduino-compatible sensor types could be used in place of the soil moisture probe.
Motivation:
I recently conducted my senior thesis exploring how these sensors can help parse zones of similar soil behavior--with regard to soil-water dynamics and static characteristics like texture and SOM--across a field. While that may not be of immediate interest to most farmers, the design I arrived at for this data logger can be applied to gather other types of data over long periods of time in remote conditions.
How it works:
This design was drawn largely from work done by Alan Mitchell, which is now slightly outdated given the development of new modules by Adafruit. The explanation of how the circuit works remains the same as he describes here; however, instead of the PIC I just used the Adafruit TPL5110 Low Power Timer Breakout board.

 Expand the reference thumbnail (or look in the gallery, but I can't seem to embed the image here) to see the circuit schematic with a functional description.
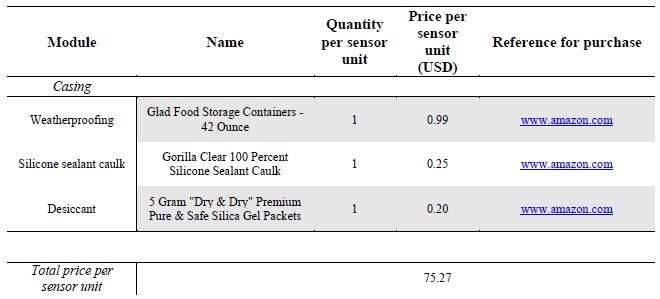
List of materials, prices, sources:
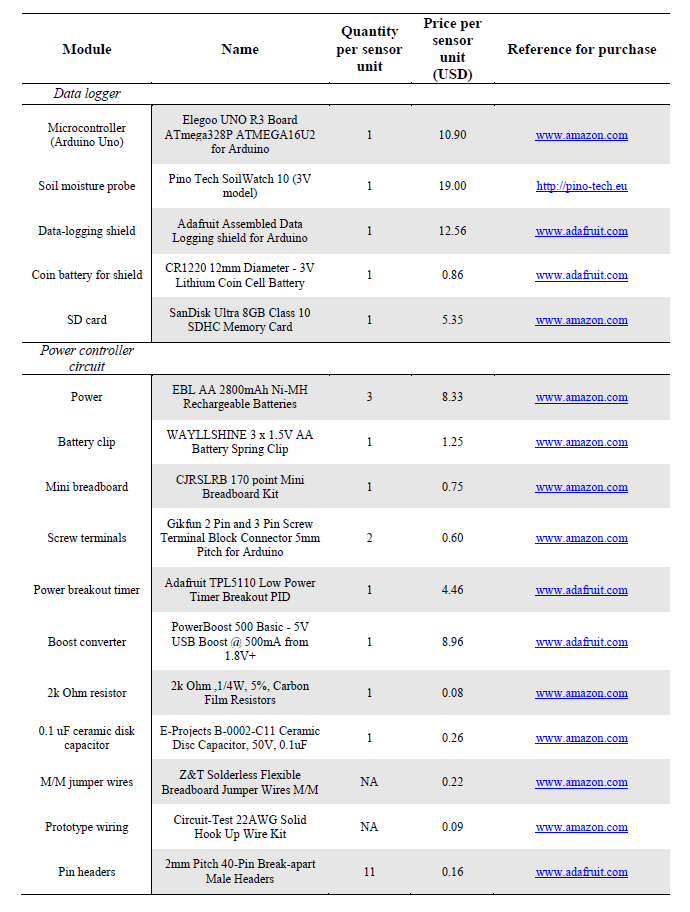
Additional tools required include a 40W soldering iron station, solder (I prefer lead-free), wire cutter, and wire stripper.
Building the tool:
@jennajane has already uploaded a nice guide/overview on how to set up the Arduino Uno with the Adafruit SD data logger shield. Adafruit has their own picture guide for this available here, which I found helpful. Additionally, you'll want to set up the real time clock via the same tutorial and format your SD card to FAT16 or FAT32 using the official SD card formatter.
If using the Soil Watch 10 soil moisture probe, solder the green wire to a GND pin on the shield, the white wire to an analog pin (A0-A5), and the brown wire to a digital pin (0-9; 10-13 do not work with this shield).
The power-controller circuit is the most annoying part to build, so I opted to use a solderless mini breadboard to speed up the assembly process. While this makes wires in the circuit a little vulnerable to falling out, I had no issues with this during my field usage of these prototypes. Simply arrange the power timer, boost converter, necessary wires, the capacitor, and the resistor on the breadboard as per the above schematic, and you're good to go. The period of the power timer module is set by the orientation of the screw head--all the way to the left (counterclockwise) means the module will drive the enable pin high once every 100 ms, while all the way to the right (clockwise) is once every 2 hours.
Some kind of enclosure will be necessary to weatherproof the unit. I opted to use a Glad food container with a silica gel packet to control moisture and silicone sealant for the edges and the opening slit cut for the moisture probe itself. I'm sure someone here could come up with a more elegant solution, but this did the trick for me. I recommend adhering the mini breadboard to the wall of the enclosure so it is less likely to move around and dislodge a wire.
Here is the power-controller from a closer view so it may be more easily recreated.

Arduino sketch:
I used the following sketch to record and save moisture measurements to the SD card.
#include "SD.h"
#include <SPI.h>
#include <Wire.h>
#include "RTClib.h"
RTC_PCF8523 RTC;
const int soilPin = A0;
const int soilPower = 4; // to be compatible with SD data-logger shield, must be any digital pin other than 10-13
const int powerCtrl = 7;
int moisture = 0;
const int chipSelect = 10;
File logfile;
const char* filename = "sensor02.csv";
#define redLEDpin 2
#define greenLEDpin 3
void setup() {
delay(800);
pinMode(soilPower, OUTPUT);
digitalWrite(soilPower, LOW);
pinMode(powerCtrl, OUTPUT);
digitalWrite(powerCtrl, LOW);
pinMode(10, OUTPUT);
pinMode(redLEDpin, OUTPUT);
pinMode(greenLEDpin, OUTPUT);
if (!SD.begin(SS)){
digitalWrite(redLEDpin, HIGH);
return;
}
logfile = SD.open(filename, FILE_WRITE);
if (! logfile) {
digitalWrite(redLEDpin, HIGH);
}
Wire.begin();
if (!RTC.begin()) {
logfile.println("RTC failed");
}
logfile.println("millis,stamp,datetime,moisture");
}
void loop() {
delay(100);
int moistureValue = readSoil();
DateTime now;
digitalWrite(greenLEDpin, HIGH);
uint32_t m = millis();
if (logfile) {
logfile.print(m);
logfile.print(", ");
now = RTC.now();
logfile.print(now.unixtime());
logfile.print(", ");
logfile.print('"');
logfile.print(now.year(), DEC);
logfile.print("/");
logfile.print(now.month(), DEC);
logfile.print("/");
logfile.print(now.day(), DEC);
logfile.print("/");
logfile.print(now.hour(), DEC);
logfile.print(":");
logfile.print(now.minute(), DEC);
logfile.print(":");
logfile.print(now.second(), DEC);
logfile.print('"');
logfile.print(", ");
logfile.print(moistureValue);
logfile.println();
}
digitalWrite(redLEDpin, HIGH);
logfile.flush();
digitalWrite(redLEDpin, LOW);
delay(3000);
digitalWrite(powerCtrl, HIGH);
delay(100);
}
int readSoil() {
digitalWrite(soilPower, HIGH);
delay(100);
moisture = analogRead(soilPin);
digitalWrite(soilPower, LOW);
return moisture;
}
A final note:
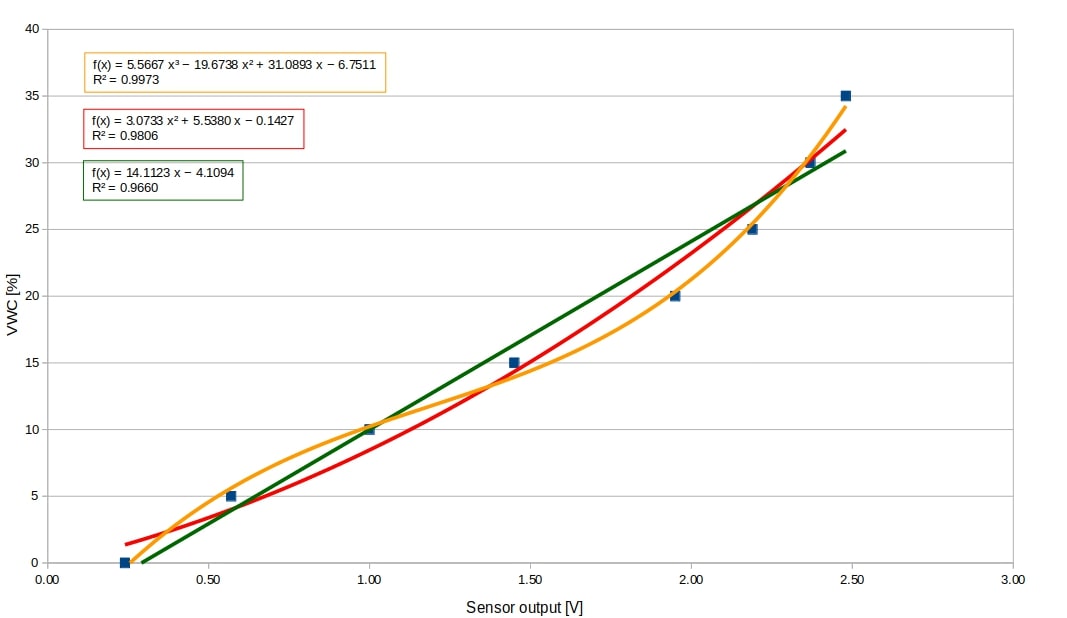
The values returned here are integers proportional to the voltage returned by the moisture probe. Multiply this integer by (5/1023) to return the original voltage value. That voltage can be converted into volumetric water content via one of the following calibration curves provided to me by Pino-Tech